


This thread will be dedicated to GFX related Tutorials. If any designer has any that they made just PM me and i will update this thread.
Here are a few that i made in the past.
------------------------------------------------------------------------
------------------------------------------------------------------------
// transparent signature tutorial -- photoshop 7 //
ive been meaning to do this tutorial for awhile now because ive seen the technique being implemented by some graphics designers here and i believe this tutorial can be beneficial to them... and others alike that are interested in the technique but perhaps not profecient with it.
the transparent signature is a sig that has a image within it that also extends outside its natural border. a good example of what im talking about is this:
i will be using photoshop 7 for this tutorial... it should be almost the same for anything at 7 or higher.. i also have CS and as far as i know, all of the commands are the same.
with that being said let begin...
first off... open a new transparent document with a size of 500x500. i know that seems big, but we will fix that later.
pull out your polygonal lasso tool. draw a border. if you hold down the Shift Key while drawing out your border you can get a perfect straight edge. try not to make it too long or too thick. mine will be approximately 400x130, give or take a little. heres what i came up with.
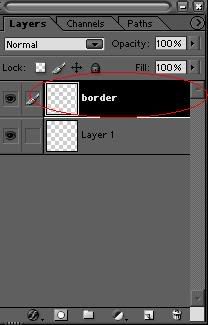
now you want to create a new layer. name this layer "Border".
make sure that the layer named "Border" is selected in your layers pallette:
with that selected, go back to your document and right click inside the border. when the menu pops up, scroll down
to where it says Stroke and click it. set the pixel at 1 and the color Black.
-----------------------------------------------------------------------------------------------------------------
( i wanna throw this into my tutorial now.. its almost like a sub-tutorial. its a little trick to apply to your image before proceeding any further to help ensure the best results in the end. this trick i learned from a awesome graphics artist named Stinger over a the RKS forums. he gets credit for this technique!!! im just using it cause its relevant to my tutorial.)
now this is a technique that is almost missed all the time... i see it alot. its simple and it can make your transparent sig turn out ALOT better. i promise.
you should have your image out already... whatever image you decide to work with make sure that it is saved with NO BACKGROUND. you can do that by cutting out your image and placing it on a transparent document. then just save as a .png file.
now go to File > Save for Web and this box should open:
now go over to where it says "Matte" and click on it... it will open a box and allow you to choose a color. the color you choose here will act as a kind of background color that will outline your image. ever see a transparent sig thats image is all white and choppy around the edges? looks like crap... well this technique will help prevent that. here is an example:
image without the "Matte" tecnique:
image with the "Matte" technique:
this technique will ensure that once you finish the signature... it wont be all choppy looking around the edges. this can be a major thing that can turn a awesome sig into something very n00bish!!!
thats basically it for the sub-tutorial!
-----------------------------------------------------------------------------------------------------------------
now at this point your gonna need to open the image that you want to use. for this tut, i will be using this image:
now for convenience sake... the image i chose is a image that has already been cut out. so if you use my image, just save it to your PC and open it in photoshop and you will see its just an image that is already cut out of its BG.
for this particular image im using i will need to resize it before placing it on my 1 pixel border document. ( our main document we are using. ) just go to Image > Image Size > decrease to what you want.
now your gonna wanna paste your image to your document with the 1 pixel black border. just press Ctrl A and Ctrl C on the image your using. this will select and copy it. now click on your 1 pixel black border document and press Ctrl V. this will paste the image. you will need to adjust the image around untill you get it how you want. heres what i got:
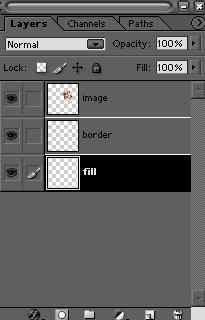
to kinda make things easier go ahead now and double click Layer 2 in the layers pallette and rename it "Image" and do the
same with Layer 1 and name it "Fill". your layers pallette should look like this:
click and select the layer named "Border" in your layers pallette. press the D key on your keypad to reset your colors.
now select your Magic Wand Tool. click anywhere inside the border. it should highlight the border now like this:
now that your border is selected, go over to your layers pallette and select the layer named "Fill". select your
Paint Bucket Tool and fill inside the border like this:
next up you wanna move the layer named "Image" down one space right below the layer named "Border". the layer "Image" should be in the middle of "Border" and "Fill" now.
now click on the layer in the layers pallette named "Border". go over and select the polygonal lasso tool. right click on your image and select stroke. set pixel at 1 and color to whatever you want. preferably one that stands out.
now click on the layer in the layers pallette named "Fill". choose a foreground and background color that you want. i chose a goldish color and black.
now go to Filter > Render > Clouds. then go to Filter > Render > Difference Clouds. hit Ctrl F a few times untill you get a cool looking cloud render. BE SURE THAT BEFORE RENDERING CLOUDS, THAT THE LAYER NAMED "FILL" IS HIGHLIGHTED
IN YOUR LAYERS PALLETTE!!!
heres what i got so far:
now the reason behind the rendering clouds is simple. its going to create a quick generic BG really quick for this tutorial. you can get more fancy with it if you want by using brushes or filters inside your BG. just make sure that when you add those, that the layer named "Fill" is selected.
at this point, your border will still be highlighted. click on the polygonal lasso tool. right click inside the image and click on Deselect.
now click on the layer named "Border" in your layers pallette. once that is selected, click on the Zoom tool.
zoom in on the image once or twice so it looks similar to this:
time to erase some of the border thats covering parts of our image. with the layer "Border" selected in your layers pallette,
pull out your eraser and start erasing carefully in the spots where the border is blocking the image. heres what i got:
now your gonna need to erase any part of the image that goes out of your border that you dont want. if you made a simple border then it will be pretty easy. what i like to do is use the rectangular marquee tool to do the erasing. first select the layer named "Image" in your layers pallette.
then go to your image and draw a square around the unwanted portion of the image like this:
then simply press the Delete key on your keyboard and ta-da!! the unwanted image area is gone! and you can do this for rest of the area that remains or just use your eraser tool. the main reason i use this technique is so that i can get a clean erased line thats up against my sig border.
almost done...
now you want to get rid of all that excess transparent area surrounding your sig. use the Cropping Tool for this. crop the image like so:
and now you should have a something along these lines:
now at this point the tut is actually over. thats the basics on how to actually create the transparent sig.
after youve finished and your ready to show it off, it has to be saved like this.
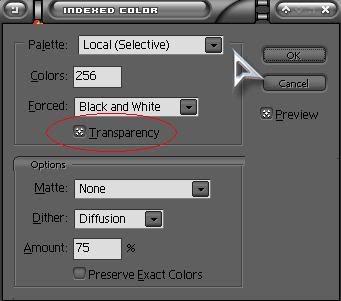
go to File > Save As > then use the following setting:
ensure that Transparency is checked and also for the part that says "Matte" you can apply the same procedure that i explained above in the sub-tutorial.
and just click OK for the next pop-up window!!
here is my final result:
and with a little more time... you can add fonts too. heres my actual final results:
that concludes my tutorial. this is the 2nd version of this tutorial that ive done. the first was missing a few things so i redid the whole thing and added some new things that were relevant. i hope the designers here find this helpfull.
peace!
-----------------------------------------------------------------------
-----------------------------------------------------------------------
each week i will post a tip that i have personally found useful in my trial and errors with the program in hopes that other designers can use it aswell. the tips may be small or big depending on the user.
photoshop tip week 1 - New Adjustment Layers with Render Clouds.
i use this alot when coloring my images... it can be used to color individual images or a the whole design.
when coloring go to Layer > New Adjustment Layer > Color Balance
it will open up this box:
at the bottome where it says Tone Balance you have Shadows, Midtones and Highlights.
choose Highlights first and move the sliders around to get a desired color tone. Press enter.
Repeat several times ... choosing Shadows and Midtones...
i usually do this atleast 3 times ... one for each setting. sometimes numerous time can achieve better results...
once your finished with the coloring you should have several New Adjustment Layers... now press the D key on your keyboard to reset your colors.
no go to Filters > Renders > Clouds. apply that filter to each of the New Adjustment Layers in your layer pallette.
it will soften each of the color tones and make it more pleasing to the eye... this can be done to single images aswell as whole designs.
also, sometimes it helps to Desaturate the image first. that can be done by going to Image > Adjustments > Desaturate
or shortcut Shift+Control+U
mess around with the different settings for coloring and you may find this useful. i use this alot and can really good results.
so till next week...
peace//
------------------------------------------------------------------------
------------------------------------------------------------------------


 Reply With Quote


Bookmarks