
Could I get those 2 tutorials?


Could I get those 2 tutorials?


sorry bro... born invincible is out for a few months on military leave... and i dont have these tutorials...Originally Posted by Mr. X

sorry...
check www.good-tutorials.com or www.pixel2life.com
Throw Ya W's Up!
Propz To Sean For Kickin' The God A Siggy
easy & fast, thx to jasper from sigtutorials.com
thanks for contribution GFX...
as far as the others that need to be uploaded.. i can see if i have the files on my laptop or external but i am not sure. if i have them i will try and upload them. i am in iraq now for the next 12 months so most of the content from those tutorials are on my hard-drive back home..
when time permits.. i would like to add more tutorials. if anyone else has any that they made please add them here.
__________________
I took this from another site and thought maybe it could be of use here. Sorry for the really large pics.
First off I know you can't do true vectors with photoshop, but honest to me they seem like the same damn thing, so what I usually do is just make it very very big and then I just size down as I need. Anyways here's a guide I made for another board a long time ago, but since this place seems to have a more avid PS community you guys might find it more usefull than they did.
Everything typed from here on out is copied and pasted from my other forum.
So you want to do some vector art with Photoshop, corrent? I hear that illustrator program is better for true vectoring, but fuck illustrator! I've had enough of a hard time with fucking Photoshop, and since I learned how to do this vector stuff with photoshop and not illustrator, that's what we're going to use.
I use Photoshop CS2 or something to that effect, but I think its all the same shit once you hit 7 and above.
Anyways, to start, you need a source photo, am I right?
BAM!!!:
Now that we have our source photo, throw it on Photoshop and lets get to work.
First you're going to want to resize the image. I'd resize this one to 1600x1190
Ok, now what you want to do is select the pen tools, and up on top, i want you to select paths:
Ok, now that you have that done, I want you to click on the brush tool and size it to 3px:
Now here is where it starts getting fun. Make a new layer and place it underneath the original layer and name it "outline" for your future reference. ANY OUTLINE WORK WILL BE DONE IN THIS LAYER, SO MAKE SURE ITS SELECTED DURING THIS PROCESS!!!! Click on the pen tool once again and I want you to start setting a few anchor points. To do that, all you gotta do is click on the picture and it'll set a new anchor point. Now don't just stick them anywhere; You have to strategically place them at certain points. Basically what you're doing is setting a rough outline for a trace. Don't worry if you put an anchor point in the wrong place; just hold the control key and click on the anchor and you can move it around no prob:
Now that you have your anchor points set, you're going to warp them to fit the outline of the picture. To do that, rightclick on the pen tool, and click on the "convert point" tool, listed on the step 4 picture. Now click on one of the anchors and move your mouse up or down. Notice the line moving? Good. Now manuver the little dots that warp the line until its over the actual outline. When you do it right, it should start looking a little bit like this:
Now once you have the line the way you want it, right click on the line and click, "Stroke path" and a promt will come up, and when it does just hit "ok". After that you can right click again and select "delete path", or hit enter.
If you do it right, your outline should look a little something like this:
Its honestly that simple. Now I want you to keep doing the outline until you get the whole picture. A little tip when it comes to doing the anchor points; 1 anchor point = 1 curve. Now you don't want too many anchor points, but you don't want too few either or else you won't be able to make the outline properly. SOMETIMES you can get 2 curves out of 1 set of anchor points, but its really tedious to do. If you do manage to do it though, you have a nicer smoother looking curve. After you're done with the outline, it should look something like this:
If it looks like that, then you're doing great! If not, that don't give up; You will make mistakes, but its all a part of learning, so don't get too frustrated.
Now that we have the outline done, its time to start coloring it in. This is where the picture really starts to come together. What I want you to do now is to click on the pen tool, and up on top, I want you to click the "shapes" icon. From here on out, you're going to be using shapes instead of paths for the color.
Now once you have that done, I want you to click on where you're going to start coloring. When you click on the picture, a new layer should pop up called "Shape 1". Every time you do a new color section, a new shape layer will pop up. MAKE SURE THESE NEW LAYERS ARE BELOW YOUR OUTLINE LAYER!! Anyways, you're going to have to double-click on the little thumbnail to the left on that shape layer:
Once you've clicked on that, a little menu should pop up and your cursor will turn into a dropper. What you do now is click on the color in the original picture that you want to use for your coloring. Usually you want to choose the color that is most abundant in that section.
Just like with the outline, you want to do a rough shape with the anchor points when doing the color. The color should fill out as you're doing the anchors. ALWAYS CLOSE YOUR ANCHORS WHEN YOU'RE DOING SHAPES! i.e. the first point should always be the last point as well. To close a shape, all you gotta do is connect 1 more line from the last anchor to the first anchor, no biggie.
Now just like with the outline, you want to use the convert point tool to manipulate the shape layer so that the color goes where it needs to go, using the original picture as a reference of course.
Now, here is a little trick I learned when it comes to layers. You can get a little lazy and save yourself some time when it comes to the coloring process. How do you do that? Well, its really simple. Lets say you're doing the hair and you're going about it normally, but you notice you're getting close to the face, but there is hair on top of the face and on the sides. That means you're going to have to have achors all over the place and you're going to have to screw with all kinds of lines and everything, right? Wrong!
*Continued in next post*
*continued from previous post*
Notice how I did the anchors on the hair the normal way, but when it came to the hair around the face, i kinda just said screw it and went everywhere? Well, I started a new set of anchor points, which in turn made a new shape layer, and I put that layer above the hair color I was doing. Then I did the color for the face as usual, and since the face color is above the hair color on the layer orders to the right, it automatically overrides all of the hair color that was on the face earlier, so by doing this you saved yourself the time of shaping the hair on the face. That's roughly 5 minutes of work you didn't have to do.
You can do the same thing with the highlights on the hair if you wish. Just make sure to put the highlight color layer below the normal hair and face color layers, and you can get as sloppy as you want, as long as you do it correctly around the outline.
Now, there is no straight up guide for layer manipulating, you kinda just get a feel for it. Like I did the hair and i had the color going all over the shirt and the neck area and everything, but all I had to do after that was make a new color layer, place it on top of the messy hair layer (just like you did with the face color earlier), and viola! I was able to do the shirt and face no problem. By manipulating the layers like that, you can save yourself LOTS of time. I'm talking a half hour at least. Oh yeah, I like to do the eyes last. They can be annoying as hell sometimes. Oh, and when you're done; make a new layer all the way at the bottom and just use the paintbucket tool and splash the background white. That way you don't have to worry about transperancy issues when you're showing off your work on different messages boards, but you don't have to.
There isn't much else I can teach you. That is the basics of the whole thing. You should be able to accomplish completing the picture using this guide.
When you're done, the picture should look like this:
Now you can resize it and use it for a wallpaper or whatever.
If you have any questions, feel free to ask here, and i'll TRY to answer them to the best of my ability.
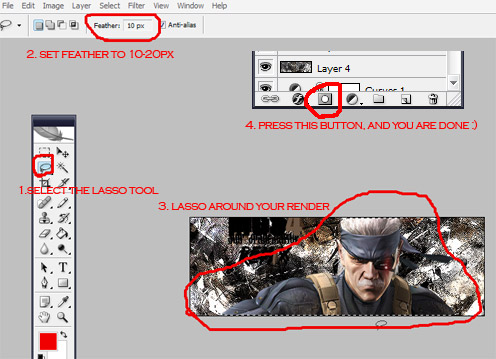
How to add a border:
Firstly, open up the image you want to add a border too.
Once opened, unlock the layer by double-clicking the layer name.
I'll be using this..
Now you to want go to the bottom of the layers palette and click
on the Create A New Layer icon highlighted in red.
Highlight Layer 1, use the Pain Bucket tool and fill it in with blk.
Go to the Layers Palette and select the Layers Style icon highlighted in Red.
A vertical list will drop, select Stroke.
I'll finish this later.
^ The easiest way to create a border is to create a new layer, press ctrl+A and go to Edit- Stroke and select your colour and size. Thanks to GFX for that.
Does anyone know any decent tutorials on smudging or displacement. I can't find any decent ones. I can't really describe it, but all the ones I find are about like creating backgrounds from the smudging and displacement, but I want to know how to get good smudge effects around a render to give some crazy effects. Like GFX has on a lot of his sigs, the "black files" in particular.
*gonna Need This Now That I Finally Switched To Photoshop*
Best Believe I Shall Return With Questions :d
i would like to start doing some more tutorials to add here. i am a bit rusty in photoshop though.. i havent touched it too much for the last 13 months other than the occasional photo touchup here and there. if anyone has anything they would like to add, please do so. Style, The GFX, Sean and all yall other cats have a lot of talent... drop a tut or something to spread the skill. peace!
__________________


I'm starting to learn this shyt tomorrow! I'll open my thread with first works, so I just hope some of vets of GFX board (Style, Winter, Sean, GFX) will feedback and hook me up with some advice!
P.E.A.C.E.
The link isn't working
The War Angel
does anybody know how to place an animated gif as your avatar and still have it move?
great tutorials
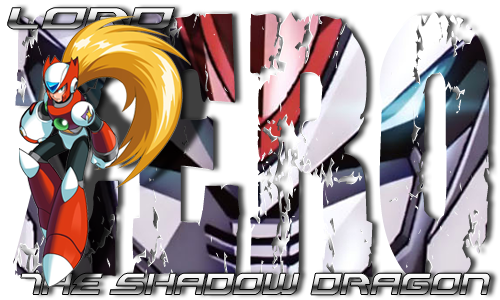
that carnage sig is fuckin ridiculous
i think ima start learning this gfx shit & design my own mixtape covers instead of paying these weak ass amateurs
 Posting Permissions


 Reply With Quote


Bookmarks